How to Set Up HTTPS for LAN Services
In this guide, we’ll walk through the steps to enable HTTPS for LAN services using Nginx Proxy Manager and Cloudflare DNS. We’ll use Vaultwarden as an example.
My Setup
I’m running Docker on Ubuntu with both Vaultwarden and Nginx Proxy Manager as containers. However, you can run Nginx Proxy Manager and Vaultwarden (or any other web app/website) on any supported hardware, such as a Raspberry Pi.
Prerequisites
- A domain name.
- A running instance of Vaultwarden.
- Cloudflare DNS configured for your domain.
- A running instance of Nginx Proxy Manager installed and configured with SSL wildcard certificates for your domain.
Steps
1. Set Up Nginx Proxy Manager
- Ensure Nginx Proxy Manager is installed and configured with SSL wildcard certificates.
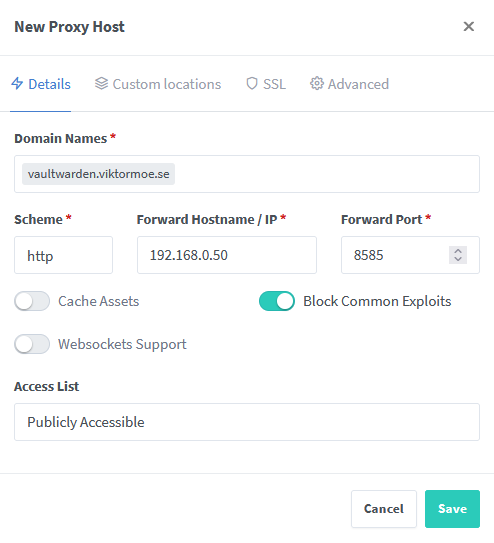
- Add your LAN-only service (e.g., Vaultwarden) as a proxy host in Nginx Proxy Manager.
- Choose what subdomain you want to access Vaultwarden with and fill in its IP and port.
- Check the “Block Common Exploits” option.
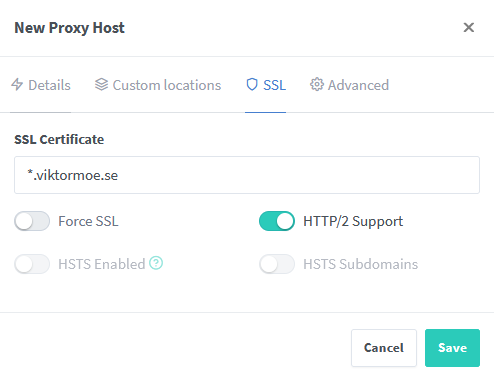
- Go over to SSL and choose your wildcard certificate and enable “HTTP/2 Support”.
- Then just press “Save”.
2. Configure Cloudflare DNS
- Log in to your Cloudflare account and navigate to the DNS settings for your domain.
- Add an A record for your LAN service pointing to the IP address of Nginx Proxy Manager, in this case “192.168.0.50”, and uncheck “Proxy”.

3. Test HTTPS Connection
- Access your Vaultwarden/other web app service using the domain name over HTTPS (e.g., https://vaultwarden.your-domain.com).
- Verify that the connection is secure and the SSL certificate is valid.
Conclusion
By following these steps, you’ve successfully configured HTTPS for your LAN services using Nginx Proxy Manager and Cloudflare DNS, without the need for local DNS. This ensures secure communication over your local network.